Quantcast
Channel: THE BRITISH RAILWAY STORIES LTD
Viewing all 149 articles
Browse latest View live

"Valentine's day special...61990 Charlotte"

$
0
0

WARNING: THIS BLOG ENTRY CONTAINS SOPPINESS. 

KEEP SICK BAGS ON STANDBY!

A few years ago...well, nearly five years ago, actually, I met someone who I fell head over heels in love with.

We've now been together for...well, nearly five years! And in that time she has put up with my hobby like no other woman could.

She doesn't actually like trains all that much, my Charlotte. I suspect it may be down to my constant droning on and on! But I digress...despite not liking trains very much, every so often she will buy me something towards my hobby, and it is always perfect. A few Christmases ago, for example, she bought me a selection of Hornby's excellent Gresley suburban coaches.

It's this model, however, which has outshone the rest.


Bought for my 22nd birthday by Charlie, 61823 is one of Bachmann's excellent K3 models.  I was absolutely thrilled as I had no idea she was going to buy me one of these!

The model was later christened using a set of custom nameplates from Narrow Planet. Guess what the name was?


Well, who else?

Of course the name wasn't prototypical (at all) but it was my way of doing a little tribute to someone very dear and special to me.


The model doesn't get out very often as, with the late crest, it always looked out of place amongst my earlier time period models.

However, that was all to change this year. I sought permission to do a bit of modelling, and gained permission to renumber and rebrand: on the proviso that the model remained in a mostly ex-works, or as Charlie put it, "not like the rest of your decrepit looking collection!"

I presented a few photographs to her a few months ago, and a suitable number was found.

Gresley K3 no.61990 was actually in real life a Scottish region engine, but if it's going to have nameplates in a fictional guise, I reasoned that it wasn't really all that far off from suggesting a change of region, or a loan, or even an SLS special down the south end of the east coast main line...


The original Bachmann numbers and crest were much more difficult to remove than previous Hornby and other Bachmann models. Since this K3 is a few years old now, I reason it must be down to the paint used for the printing.


The now standard method of T-Cut and cotton bud to remove the numbers, and then sealing with Johnson's Klear, applied from an airbrush, was used to gain the shiny finish, which was applied in several coats to the boiler, and one coat to the smokebox to take away the plastic looking finish.


A few changes at the front end were made. The nameplate on the left hand side is now painted black, sealed with Klear for the shine. The other side remains red. One of each! I figure this will quieten down a certain friend of mine who complains about my "Pegler like fixation with red nameplates!"

I do think the red nameplate looks striking, but there is an elegance about the gold and brass look that I will admit, is very pleasing on the eye.


The other change was to remove the BR era lamps, and replace them with Springside LNER pattern oil lamps. The express headcode is being kept as I intend for no.61990 to act as our resident "pilot" locomotive for use on Ganwick curve.

Certainly, this Bachmann K3 has proven itself an excellent runner, smooth, quiet and reliable (if a little bit similar to a duck in its waddling fashion), and it'll fulfil a very useful role.

I plan on buying a few more K3s in order to fill the necessary freight slots, and they will be weathered extensively, but this one is rather special, and will remain as it is: more or less ex-works, beautiful and unique.

Just like my beloved Charlotte, who bought it.


Of course, this isn't her actual valentine's day surprise. There is a large set of twenty four pink and red roses winging her way to her door, and after work on Friday, she is going to be whisked away to Bath for a romantic weekend away!

Until next time, happy valentine's day everyone!

"Long term project updates: 60113 Great Northern"

$
0
0

Having had both of my A1/1 chassis back from a good friend recently, who very kindly took on the job to fit  Graeme King's excellent etched parts for the valve gear, I've restarted work on both of my Thompson Great Northern conversions. For the time being, I will be concentrating my efforts on the model destined to be painted in express passenger blue, and numbered 60113 with the original straight sided nameplates.


I have made a slight deviation from Graeme King's method of dealing with the front bogie (which you can read about by clicking here), and chose to go for something within my skill set. Basically, I used a set of pliers to turn up the ends of the connector, to form a U shape. I drilled a new hole, just off centre of the square part at the rear of the connector, and the result can be seen below:


The idea behind it is that it gives the bogie enough manoeuvrability on the track, whilst also giving the correct wheelbase, and allowing the resin side frame pieces to fit either side.


This chassis, incidentally, was a spare I bought off eBay some years ago, which was DCC fitted with a very nice chip whose origins I have been unable to discover. It runs very, very smoothly on DCC, and unlike all other DCC fitted chassis I have used does not stutter on DC for various reasons in reverse.


Forward and reverse gear proved remarkably smooth. The model will get a run in next month at High Wycombe Model Railway Club, when I hope to have completed more of it (perhaps even in blue paint by then) and have finished a large amount of the build on the apple green variant too.

Until next time.

"Great Northern: a few minor updates..."

$
0
0

I've very much enjoyed building my replacement A1/1 Great Northern from Graeme King's resin parts. 

I'm now at a stage where the locomotive doesn't look different, update to update, but there's been quite a few changes of a minor variety which have brought the engine closer to completion.


The main change from last time is the side sheets on the tender. These have now been straightened, and will be finished off with a bit of Humbrol plastic filler to blend in the Gamesworkshops green putty before adding the handrails.


I've also done the steam pipe, and handrails on the boiler (both sides) and the tiny little grab handles on the lower side of the smoke deflectors. The front coupling has also been test fitted at this stage. I do hope to get some time in the next week to fit the side frames of the chassis, but I ran out of time this week sadly.

I do of course have to fit the reversing rod and the casing on the side of the firebox too, along with straightening out the cab side sheets. After that...and we're into the painting stage. I can't wait to see it in blue, it will be the culmination of around six years worth of modelling in all its forms (resulting mostly in failure) but now producing a locomotive satisfactory for my needs.

Until next time, when I will show some updates on the apple green version of 60113 as well. It's had the major parts cut and shut, but not glued together. This model is much, much further along, and I am dreading the tender cut and shut I am likely to have to do on the apple green one (which is perhaps why I am holding back so much on it).

Have a very good Sunday!

"Rant of the Week: Ranting about ranting!"

$
0
0


Ranting about ranting. A popular past time on several model railway forums at the minute. 

You can't say this, you can't say that, you don't know that or the most infuriating one, you don't know that, I do but I'm not letting on what the answer is

End result is that people start complaining about other people complaining.

Complaining about complaining. Ranting about ranting. It's an absolutely exasperating concept. 


Model X has a detail wrong. Modeller 1 says its fine, not bothered. Modeller 2 says he doesn't like the look of it, but thinks adding an after market extra would improve it. Modeller 3 says Modeller 2 is a whiner and then Modeller 1 joins in to start complaining about how ungrateful Modeller 2 is.

Modellers 4 and 5 then ask why Modellers 1 and 3 are complaining about Modeller 2's plans for improving Model X, as the core subject - railway modelling - is defined by actually doing more than opening the red/blue/blue & silver/yellow cardboard box and plonking it on some track, and at what point did the hobby arbitrarily decide that modellers shouldn't critique models in order to make them better or personalise them...?

Modellers 1, 3, and 6, 7, 8, 9 and probably 10 onwards all start to chime in with posts supporting how absolutely phenomenal Model X is (even if there's a missing detail, or the motor arrangement peeks into the corridor partition, or in fact the bogies have been designed the wrong way and, guess what, traction tyres and strange couplings are provided as standard...which don't actually work) and that Modellers 2, 4 and 5 are ungrateful/missing the point/have OCD/fill in the insult of your choice here.


This may sound a familiar concept to you. Guess what: it's been symptomatic of a few years in which we've seen some fantastic models from the major manufacturers, and at least one particular lemon, which was given a thorough looking over by some very well informed modellers, and actually drew the conclusion that it wasn't very good. 

It started out with a release of a four car EMU. Some people pointed out potential pitfalls, and accuracy problems, explained how to fix them and make the model better. This is inherently a good thing. 

Positive, constructive critique that (by way of being critical - not unkind, critical, which is an entirely different thing) shows how a model can be improved using A or B after market products. This helps everyone. People can make up their mind whether to buy, with whatever faults there are, and if they do want to improve the model, how to.

However with a recent lemon of the last two years, a change started happening. A sudden undercurrent of positivity. It was absolutely frowned on to make any criticism of the model, drawing quite surprising abuse aimed at modellers doing their level best to give a reasoned and balanced one. Ranting about so-called complaining that...wasn't actually complaining at all.

Complaining implies there was no truth to the critique: that it was unsubstantiated and put across in a very negative manner. This could not be further from the truth with the many honest and thoughtful individuals, reviewers and bloggers in the model railway community. 

It has however become the fashion to make it look like this is the case, for whatever purposes that entails.


As such, I am now reading a lot of posts ranting and raving about a lot of ranting and raving that doesn't seem to actually exist. 

This has been happening an awful lot lately and I simply don't understand why it has been allowed to be so one sided against any form of critique.

I fully agree with the view that sometimes people need to be reigned in with what they say and "engage the grey matter" in order to present their views in the most constructive manner, but it goes both ways. 

Without any constructive criticism or discussion of a model beyond "X and Y are producing this, how much does it cost and when is it coming", what exactly does this hobby entail then? Opening the box and putting it on a section of set track? Slaps on the back when the latest new red or blue box appears, without then going on and talking about what you're doing with it thereafter?

Years ago on a certain model railway forum, we were positively encouraged to talk about using RTR as a basis for improving or personalising for our own use. You know, the thing I talked about earlier - what was it called? Modelling? 

Now on certain forums (and I do use the plural here with good reason) it's almost become offensive for anyone to suggest that a new off the shelf model can be enhanced. At what point did looking at a new model and saying "that doesn't look right - here's a method of improving it" suddenly become something to be sneered at? 

You know, the very thing which defines railway modelling - individualism and creative use of materials to model a chosen subject - becoming the very thing which gets peoples backs up with new releases?


There's been a similar aggravation with the cost of new models. In my view, the consumer has a right to question whether he's getting the bang for his buck. He or she is always going to compare to similar products in the market and ask whether the specifications of one and its cost are comparable to another. 

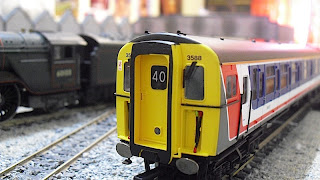
Let's take the recent Hornby 2-BIL as an example. I personally don't care who chose what or who got what to market first, the fact is Bachmann did the 4CEP, Hornby did the 4VEP and have now done a 5-BEL and a 2-BIL whereas Bachmann have done a 2-EPB, are doing a Thumper unit and have also done the 350 Desiro in the meantime. 

All perfectly comparable EMU/DMU units of varying specifications and prices that you could have a fair and reasonable debate on price against specification on.

In fact, it's pretty easy to do a comparison of similar models. Try the Hornby 4VEP against the Bachmann 4CEP: which is better value for money? Look at their specifications, RRPs and their accuracy to their respective prototypes. 

In my view, that's a one horse race where only the model in the blue box is actually in the race. I say this having owned both models for an extended period, and the former causing a lot of angst in terms of trying to get it to a form which was acceptable to me. It wasn't possible, more for the wholly inadequate running characteristics, and particularly and markedly when the latter was just so weighty and smooth in its movements.


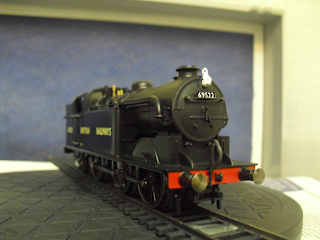
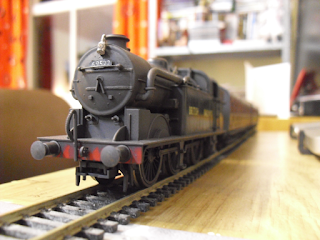
Let's take another example: which flips the debate a little bit. The Hornby B1 can be rightly compared to the Bachmann B1 by virtue of being the same locomotive prototype, more or less (though the two models actually cater for different batches and other details) and although the Bachmann B1 has a new lease of life with its excellent new chassis, the body is showing its age, and Hornby's model overall eclipses it. 

This is a fair comparison. I don't think it's negative, nasty or otherwise to say that the Bachmann model is inferior. It's a stonewall fact of the matter that it is not as good as the Hornby B1.

However, can the Bachmann B1 with some work be turned into a good model? Yes it can, undoubtedly so. There's lots of material out there on the model railway forums which show what can be done to a Bachmann B1.

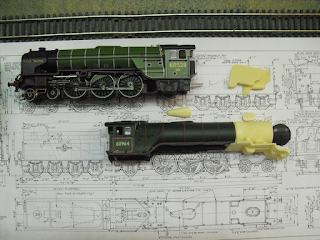
The Hornby B1 is by no means 100% perfect either. Neither the chimney nor the dome are very good for shape against the prototype, however the rest of the model is excellent. In my case, neither item is poor enough to warrant changing, but for some modellers it is, and that's fine. It's their model and they want theirs to be more accurate. I respect those modellers greatly for it, as they are doing something creative which will enhance their model, for them. 

I believe completely in the right of the individual to look at critiques other modellers give on new models, and make their minds up for themselves with all the information to hand. Not to be told what to do or what to think without being able to read a range of views.

A very wise man once said that "It is important to draw wisdom from different places. If you take it from only one place it will become rigid and stale".

It is the same with opinions on model railway products. That's why we have forums. To discuss the pros and cons of the various products on offer, and how to improve them if they are not wholly to our liking.


That is what I was always led to believe. It is becoming much more difficult to believe that, however.

I fear the real death of the hobby won't be old age, interest or disposable income. It will be the death of debate, and the ability to constructively critique a model and see what can be done to improve on it.


Until next time.

"Hornby Thompson L1 Musings"

$
0
0

I love Hornby's Thompson L1. They are simply superb models. I have four of them, with three out of the four currently awaiting renumbering and rebranding.


One of those awaiting rebranding is no.67717, which is an apple green variant, which has BRITISH RAILWAYS in bold on the tanksides, and the curly style numeral six in its number.

I was researching potential subjects when I came across this delightful combination in the L1 edition of Yeadon's Register.


The locomotive has LNER apple green livery, with LNER lettering, but the full British Railways numbering, and with a curly six to boot!

I am very tempted to model this locomotive, partly because with careful removal of the numerals and lettering, it's not actually going to be that difficult a conversion. My only question is: did it have a smokebox numberplate at this point in time or not? Another of life's little research headaches!

No matter, for it's quite clear at a glance that up to 1950 there were still apple green L1s sans the smokebox numberplate. 67702 may well have been one of those few locomotives so treated.


Then of course, you have to take into account electric lighting fitted, and non electric lighting fitted locomotives!

Until next time, when I hope to be continuing the work on a certain Thompson Pacific...!

"Suburban Shortness: Gresley N2 plus Gresley Teaks"

$
0
0

I get genuinely cross sometimes about my lack of being able to run trains, but now I can say with confidence that I have my first "complete" train to run on my work in progress first proper layout. My suburban tank engine of Gresley class N2, no.69522, has had a few layers of grime applied to her coat of Johnson's Klear, as have the superb Hornby teaks she pulls behind her.

It's a short train of Gresley brake third plus an all third, but I have a cunning plan as I have evidence this was a very real train used in the late 1940s...but more details on that, the weathering of this train, and the building of the new layout, in March.

Until then, enjoy the rest of February!

"Great Northern on the final straight..."

$
0
0

I've been working on a model of Thompson's lone A1/1 Pacific, Great Northern, for what seems like forever at times.

However with the failure of my original build, out of the ashes comes a much more pleasant and more accurate affair, with the help of Graeme King's excellent resin parts, a much valued friend and modeller to work on the valve gear for me, and a little bit of bravery to have a go and chop up a Hornby A3 to build a Thompson 6ft 8in Pacific!


At the front end, I have test fitted the buffers, which are a loose fit with white tack, along with the front coupling. The lifting holes in the frames have also been drilled out, and the smoke deflectors have gained their grab handles on the lower edges.

The smokebox has had the holes for the original handrails filled in (these areas will require further touching up, as my dry brushing with black acrylic paint has proven in this photograph).


The tender has had its side sheets straightened, but I am yet to add handrails. The cab is the next section to tackle on this particular model of 60113, as these need straightening to match the tender.


I have also fitted the steam pipe, and handrails on both sides, along with all of the running plate paraphernalia, including the lubricators.


You may notice that the bogie has changed from the last update. This is down to an amazing oversight on both mine, and Hornby's part. Earlier models of the Gresley A3s and A4s had the pivot on the bogie set at a particular height. The latest models have a longer pivot, which was causing the front end to lift up unnecessarily! I have replaced the later type with the older type, until I figure out how to shorten the pivot.


The final change has been to fit the side frames. These are now firmly fitted in place, with some heavy duty plasticard sandwiched between them and the chassis block, glued with cyano.


The bogie (originally a Gresley type) has been replaced with a Hornby B1 bogie of the correct type, giving the correct look at the front end, and side frames. The clearance of the bogie is excellent, and I have been very encouraged by the model's test runs on 3rd and 4th radius curves.

I still need to fit the cover for the reverser on the left hand side, in addition to the aforementioned cab side sheets, and fitting of handrails there and on the tender.

Then, it'll be into primer, and then into blue before lining out...I can hardly wait. Six years after I started the original, I'm finally going to have my express passenger blue Thompson A1/1 I've always wanted.

Now where ARE those straight sided nameplates I ordered...!

Until next time.

"We're in the printing stage!"

$
0
0

The excitement for the forthcoming children's paperback book, Tale of the Unnamed Engine, is building as we are now in the printing stage of production!

The artwork for the Amazon Kindle and Kobo eBooks has been updated to match the paperback's new artwork.

I will keep everyone posted throughout March as we develop the book further and get towards the delivery stage.

I can also confirm with delight, that the RRP for the paperback book will be £7.99, an excellent price for the quality and length of the book.

Until next time!

"New project musings...Thompson B3/3?"

$
0
0

I still have a few Bachmann B1s knocking about, despite now being superseded by Hornby's excellent model. I'd recently bought this spare Great Central tender (spare from a Bachmann Great Western 2251 locomotive, as the GWR pattern buffers attest), and the idea forming is building a model of Thompson's lone (and apparently poor) B3/3 locomotive.

It would need 6ft 9in wheels or similar (Hornby 6ft 8in wheels perhaps) on a wheelbase with pretty even driving wheel spacing. It is in fact, bar the front arrangement, the same wheelbase as the "proper" B3, of Robinson design and Great Central Railway origin.

If I ever get further than this mockup, it would produce another unique locomotive, that is for certain!

Until next time.

"A4 Conversion Etches - further update"

$
0
0


I've had a surprising amount of interest in these etches to convert a garter blue Hornby A4 into either its post-war variant or into Sir Nigel Gresley of the 1980s, so an update is necessary.

I'm taking delivery of a further set of test etches from Peter Harvey, which I will use over the coming weeks on a further A4 model, and will showcase the build on this blog. This takes into account previous discussion, including the addition of some etches to represent the cab front window spectacles, and some slight modifications to the artwork for parts to fit more cleanly.

Once I've finished with these test etches (and only if no further problems are found), I will be making them available for purchase later in the year.

Just want to add my thanks to Peter Harvey for his work in developing this product, and to everyone interested for their patience in the development of these etches. 

Until next time!

"A4 Conversion Parts, Final Test (Part 1)"

$
0
0

It's been nearly a year since I started developing this conversion kit to make a late 1940s London & North Eastern Railway garter blue A4 Pacific, from a Hornby 1930s A4 Pacific. In that time I've dealt with the first set of trial etches (which you can read by clicking here: Part 1, Part 2), identified some shortcomings and had the artwork modified to take into account these shortcomings. The result was no.60011 Empire of India.

Peter Harvey has been terrific throughout the prolonged development process, and I can show here the final set of test etches, prior to testing them on the next "guinea pig".


However, you will note a new brass etch amongst the original two sets. This third etch is for adding Cab window spectacles, a suggestion made on the LNER forum and now acted on.


The initial thought is that the etches are the right size and shape (a very good start!) and that the removal of the silver painted faux spectacles will allow the brass ones to look the part better. I will start by stripping the printed numbers on the cabsides and smokebox front of this model, before continuing on to repeating the process I worked through last June in terms of removal of the valances, and addition of the etched components.


One change I will be making to this build, is to fit the lamp irons as the designer intended (the etch is designed to be used to create the correct shape and design lamp irons, which Hornby's model does not portray).

The intended identity of the guinea pig has been chosen, and it will be no.32 Gannet. You will note that the tender behind is not the correct type. The reason for this is that I am waiting on a spare garter blue non corridor tender which I have lent to a friend for use on his exhibition layout of sorts.

When that reappears, it will be coupled behind Gannet, which will be the first and only one of my A4s in full LNER livery, albeit with stainless steel lettering and numbering, and no.32 on the smokebox front.

The original locomotive survived well into my chosen time period in LNER livery and never actually carried British Railways branding whilst in garter blue. This therefore made her the obvious choice, amongst numbers 14, 25 and 26 (Silver Link, Falcon and Miles Beevor respectively).

This makes her the second bird namer in the fleet after Mallard, the ratio of the "special" A4s to the normal A4s being quite out of balance for a normal working timetable to be frank.

Once I'm satisfied there are no further changes to be made to the artwork, I intend to make the etches available for sale, both as a set of the three etches together, and the two smallest etches separately.

If anyone has any feedback on this product they'd like to share, please do so via the comments section here and on any blog entry featuring the A4 conversion etches.

Until next time, when I should have finished working on this one!

"Vote for Allen as the world's most famous steam locomotive"

$
0
0

Dear everyone,


I'm NOT the most famous steam locomotive in the world, but I'd like to be! 

I need three nominations, and lots and lots of votes! 


Many thanks for your continued support of our stories,

Yours faithfully,

"Allen"


(Dictated, not read)

"A4 Conversion Parts, Final Test (Part 2)"

$
0
0

The first part of the build for this final guinea pig in the A4 Conversion Etches development, was to T-Cut the whole bodyshell and the tender to get a bit of sheen on the plastic. After some hours bringing a more metallic look to the front end in particular, it was time for the scalpel to come out, along with the tried and tested valance cutting tool.


Obviously in this picture it looks rather rough and ready, but that's what the big file in the first photograph is for! The overall finish of these cuts are much superior to 60011 Empire of India in almost every way. The second time around, gentle scoring of the plastic followed by careful dragging of the scalpel through said lines, allowed the valances (once the cutting tools were removed - they are glued in place to the valances to help with the scoring) to be bent away with a set of pliers very easily, a section at a time.


This gives you this result, with the etched firebox sides and other paraphernalia attached, including the etched access hatches at the front end of the smokebox casing, near the parabolic curve. I opted to paint these prior to gluing them onto the model, using Railmatch Garter Blue after an undercoat of Gamesworkshops Skull White.


On the left hand side, the reverser was also added.


Fox Transfers etched lettering and numerals were bought for the tender and cabside. The lettering was carefully put into place by marking out their places on the tender using masking tape, with a little super glue applied to the underside of the letters before carefully and firmly pushing them into position.


The result is surprisingly neat!


The next step was to add something I didn't do on Empire of India, and which I regret not doing: adding the superb etched lamp irons. Peter Harvey has done a magnificent job designing these to be fully accurate to the A4 Pacific type of lamp irons.


They come in two halves, and can be soldered or glued together to fit. The three lower lamp irons are the same design, the upper lamp iron is a different type and simply needs shaping, and then gluing to fit. They are surprisingly sturdy, and I'd wager that a carefully drilled set of lamps would fit rather nicely onto these.


 As you can see from this shot, nameplates (from the Fox Transfers range) have been applied, along with the cabside numerals, and the centre positioned lamp irons have now been painted a gloss black, to match the smokebox front.


Overall, this build has been very enjoyable, if not entirely perfect (and mainly down to my hand fistedness with the T-cut and cotton buds!) but this is why you do test builds, to iron out all of the bugs.

The last things to add are transfers to the front end of the casing (no.32), the etched worksplates for the cabsides, and some weathering, which I must admit I am reluctant to do as the model does look very nice in a pristine condition. However, I cannot find a single photograph (and there are a good dozen of no.32 in 1947/48/49) of Gannet looking anywhere near clean, so into a nicely weathered (but "looked after) form she will go!

Until next time, where I will finish off no.32 and start talking about the potential release of these etches for general sale.

"A4 Conversion Parts, Final Test (Part 3)"

$
0
0
 

All done! The final test for the A4 Conversion etches has been completed, correct lamp irons and all.


Fox Transfers numerals were applied to the front end, and sealed with Johnson's Klear, airbrushed on. Gloss black enamel paint from Humbrol was used to blend the two middle lamp irons into the rest of the front end.

I am unsure of the paint finish of the two outer lamp irons, as Mallard's current form, and that of Sir Nigel Gresley when repainted into this livery, are different (the latter painting the lower section garter blue to match the valances).

So I am researching that further before committing myself one way or the other.


The tender wheels were replaced with the correct liveried ones, to finish the model off.


I'm debating whether I should weather the model or not, but for now, I'm enjoying the high gloss finish on the locomotive.

I've very much enjoyed this project, and I am looking forward to making them available soon to modellers who want to do a conversion of their own.

Thompson's numbering system, together with the chrome numerals and lettering of the post war garter blue livery, really do set off what is in my opinion one of the finest locomotive classes ever built. The removal of the valances really does add to the locomotive too.

It's the most handsome form of these locomotives, and it is a shame in many respects that no A4 Pacific has appeared in this particular form. Sir Nigel Gresley has come close as a garter blue no.4498, but I suspect applying the Thompson numbering system to Gresley's most cherished preserved locomotive might be a step too far!

I'll be doing more of these conversions in future to allow myself to model all of the A4s I want for my future home layout, but for now, I'll be moving back to the suburban end of things, with an upcoming N2 conversion, more L1 renumbering and modifying, and the last few bits of building 60113 Great Northern.

Until next time.

"West Riding Musings"

$
0
0

Recently I visited Halifax in Yorkshire, for various reasons. Aside from the subject of my business meeting, it was an opportunity to take a few photographs of Halifax's railway station, and its track work.  I did so in the snow of January, and it presents a very pretty picture in my view.


The station building is magnificent, and has been recently externally restored. This is a shame, as in some respects it rather stands out amongst the buildings of Halifax, which are stone and normally covered in thick layers of soot and grime from the industrial age. If I were to model a station alone these lines, I'd definitely go for the weathering jugular, so to speak.


The signal box is rather quaint, and is still in use I believe? Certainly I saw someone come out of the box, and another enter within a few minutes.


The station itself has been modernised, with one of the tracks partially removed (as far as I could see beneath the snow) and the older buildings supplemented by modern "enhancements", which did much for the warmth inside the buildings, but nothing for their looks in my view. The corrugated metal additions, in particular, destroying the beauty of the older railway architecture.


The whole station and the railway running through it is raised above ground level, on a series of viaducts and embankments. Towards the hills and the mill beyond, there are other outlying warehouses, and in the distance can be seen a tall industrial chimney, beside a part of the canal.


I noticed what must have been the original footbridge, had been closed off and then the planking removed. This is due to the original station building now being a children's day care centre, with the platform on this side also being out of bounds.


It is rather surprising how much of Halifax's older railway structures are still extant in many respects, given the level of additions made to the outlying buildings around.


The glass front you can see on the opposite platform is now part of the children's day care centre, with the canopy and most of the original station building thankfully left alone. It is a great shame that the glass panels had to be added all the way along, but I suspect it's for the best in many ways. At least they have been added rather more sympathetically than the corrugated sheeting elsewhere on the station.


I visited part of Halifax's canal system, spotting some lovely canal boats in the process.


I've always wanted to do a canal diorama of some form on a model railway layout, so it occurs to me that now may be the time to do it.


So here's a really basic, rather crudely drawn idea of what I have in mind for a West Riding layout. I have for some time thought about a "Thompson Mill" set in the West Riding, where the excellent model railway layout of years gone by, Tetley's Mills has appealed and been a great source of inspiration to me.

However, whilst looking on Google maps to get an idea of the area more, I found the remnants of an actual mill which was on a real Thompson Road in the Halifax area, so the new name is likely to stick.

I suspect the next stage is to find some railway planning software (Templot most likely) to ascertain its potential further. It has to fit onto two boards of 5ft by 1.7ft-2ft wide, and the curved sections have to be designed to fit an existing and rather useful fiddle yard (which is one of two I previously created for the now shelved Ganwick Curve layout).

Until next time.

"Great Northern: cab sides and bogie modifications"

$
0
0

Having found myself with a lot more time on my hands (and a lot less money) I've elected to finish all of my major outstanding projects, and where possible to trim the locomotive and rolling stock fleets to supplement my income from YouTube and the children's eBooks, which in addition to my first paperbook release later this month, have become my sole source of income.

With the job situation more or less up in the air (I've been applying for around ten to twenty jobs a day and then some) I found I had a bit of modelling mojo back.

That being the case, first on the list of outstanding projects to finish was the first of two models of Great Northern. I am building one in apple green (the subject of later blog entries no doubt) but it is the express passenger blue model which is taking priority.

The stage of the build I had been dreading was straightening out the cab side sheets and tender side sheets. After unsuccessfully attempting to straighten them out using heat applied to a vice (ala Graeme King) I simply cut the side sheets off and reapplied them straight, using Gamesworkshops yellow/blue to green putty and Humbrol model filler to blend them in and smooth them down.


The cabsides have come out rather better than the tender sides have done for the moment, and have had their vertical handrails added accordingly. The tender sidesheets will have to wait until later in the month to be seen to.


The next bit I attended to was the front bogie. This is actually a spare Hornby Thompson B1 bogie, with the dreadful NEM pocket removed with a hand saw, and the remnants filed down. You can just about make it out in the photograph above (I will be adding more filler and filing to this to get a smooth surface.

The reason for the swap is simple. The bogie type is correct for 60113, and the Hornby B1 wheelsets are a much better match for the large bossed wheelsets of Great Northern and the other Thompson Pacifics.

I sincerely wish Hornby's B1 bogie was available as a spare, complete with wheelsets. I'd have a good number of them. They are weighty, the wheelsets as I say, are very good matches for the prototype, and in addition to this, they seem to absolutely glide through curves and points without any fuss.

The Gresley bogie which was replaced was giving an inordinate amount of trouble. 60113 has had tests of its running quality throughout the whole build, and derailments were always caused by the front bogie.

Since changing the shape of the bracket, and adding the Hornby Thompson B1 bogie, I've had no problems on both a friend's very extensive layout, and a temporary circle of 3rd and 4th radius curves set up at home on a spare board.

We're inching our way towards the paint shop with 60113. I need to sort out the reverser cover, and the electric lights before priming the model later this year. I am looking forward to the day I can run an express passenger blue A1/1 for the first time, with no mishaps...!

Until next time.

Oh, and if anyone has a job in compliance, insurance, or model railway writing (wishful thinking!) I'd be happy to send my CV on...

...but until then, I'm CEO of The British Railway Stories Ltd, and I'm very much looking forward to mine and Dean's first children's book, Tale of the Unnamed Engine, coming out in paperback very, very soon.

Good night all.

"Great Northern: the niggly bits..."

$
0
0


We're at that sort of stage of the build, where Great Northern doesn't really change much on a first glance, but it does take a lot of time and effort to add the smaller, niggly bits.

In today's modelling session, I added the top electric light, and its conduit down the left hand side of the smokebox (which is a piece of 0.5mm brass rod, shaped to curve around the smokebox and carefully glued into place). The bufferbeam electric lighting will be taken care of at a later date.


The next job was fitting the speedometer, a very prominent item which was based on the A4's own type. I actually used a spare speedo from a Hornby Mallard model, which is not 100% accurate but a very good approximation. The V shaped bracket was lengthened with a bit of plastic rod, and the speedo glued onto the underside of the running plate.

All of the handrails have now been fitted, along with the reverser cover on the left hand side, and the cylinder drain cocks have also been fitted to the cylinders. These are spare Bachmann A1 components and are very close to Great Northern's actual set. I have done a little test run with the model to see if there are any problems with their positioning and the bogie's, and there doesn't seem to be any...yet!


Final photograph for the day, just a close up from a particular angle which I thought showed the bulk of Great Northern off rather nicely.

Until next time - good night!

"Gresley N2 into an Ivatt N1 - test build, first shots"

$
0
0

I had a pleasant surprise in the post today: one of AJModels very promising looking Ivatt N1 3D printed bodyshells arrived.

The bodyshell has been designed to fit on the Hornby N2 chassis, and you can read more on its development here on one of the many model railway forums I peruse. 

The bodyshells are available to purchase from AJmodels shop on Shapeways.


AJModels have identified previously a problem with the print, a missing portion of the centre driving wheel's splasher on the right hand side. It's not a problem for me as I will simply add a shaped piece of plasticard to fill it in. This has since been rectified, with the CAD model modified to account for this strange discrepancy.


Inside the cab you will find a rather ingeniously placed set of four buffers on a sprue, which will need removing and cleaning up prior to fitting, if you wish to fit them. In my case, I will be fitting a set of spring buffers, and thus won't require my plastic set.


After a bit of modification to the bodyshell, I got it to fit the N2 chassis. The donor chassis is the latest Hornby N2, split from the 1948 Olympics Train Pack (as is the N2 on the right, albeit renumbered, modified and weathered).


There are three main areas where the model needs to be modified to fit onto the new chassis, as the previous Hornby chassis (and that of previous companies which made the N2 model) is slightly different in setup.


On my model, slots have been cut in the back of the bunker to accommodate the slot in fixtures of the latest Hornby N2 (on each side of the back of chassis, two moulded lamp irons act as plugs into slots on the plastic bunker).


The plug for the screw at the front of the chassis remains in the same place as the Hornby N2 of old, but the new model has a deeper chassis and therefore the plug on the bodyshell needs to be shortened to fit.


On my N1 model, I have removed the steps as I will be using those from the donor N2 bodyshell (which will also give up piping, handrails, buffers and similar).


The front end of the N2 chassis needs to be filed back, as per the chassis on the left (on the right is an unmodified N2 chassis).


In addition, the diecast weight needs to be removed for the bodyshell to fit on top.


My biggest concern for running quality is the lack of weight over the driving wheels. I am therefore going to investigate cutting this diecast weight back around the point of the two screw points, in order to make the chassis heavier and keep the weight firmly over the driving wheels. As it stands, it's rear heavy (as the motor and gearbox are at the rear of the model, over the rear trailing truck) which will reduce traction significantly.


I cleaned up the model using slightly warm, soapy water and an old toothbrush. This must be done to remove all of the waxy residue from the printing process.


As you can see, the motor is a snug fit under the cab rear spectacle plate. I suspect I will need to build up a small floor here to place some coal on top.


Side on, it's surprising how different, and also very similar, the Ivatt N1 is to the later Gresley N2. What is clear from my inspection of this bodyshell, is that AJModels have designed in a lot more detail than is present on the Hornby N2 (by virtue of its heritage). There are several versions available too, to account for superheated and standard locomotives in the class.


Overall, I am very impressed with the bodyshell. It will require some filing down, filling in, and other alterations, but it hasn't taken a lot to get it to a stage where you can see it really looking the part.

This fills a significant gap in West Riding steam, and does it in a remarkably easy way. No soldering iron, no brass, and once you've bought a £40 or thereabouts Hornby N2 off eBay or similar, and then the body shell from AJmodels, you've saved a lot of time and effort off buying an etched brass kit, plus the motor, gearbox and wheels.

The use of the latest Hornby N2 as a donor model also makes this possibly the first Ivatt N1 that is DCC ready!

This method will not be for everyone, and I fully understand the attractions of a brass kit, but the cost, effort and finish of this bodyshell more than cements my view that 3D printing is going to change the way we look at the hobby significantly more and more.


I highly recommend this product from AJModels.  If the intention is to model West Riding steam, and West Riding Ivatt N1s at that, then there's no better product on the market. Well designed, with lots of detail, minimal modelling effort required to get it fitted to the standard chassis, different variants of the class available too, and moreover cheaper than an etched kit overall.

I'll be getting on with finishing the build later in the month. Until next time, thanks for reading.

"Great Northern - www.a1/1trust.com ...?!"

$
0
0

A little bit of humour with the title of this blog, for I well remember the lovely grey livery 60163 Tornado carried during her running trials on the Great Central Railway in 2008. Was a great year to be a Loughborough University student!

We're well and truly onto the final straight towards running in trials for 60113 Great Northern. The two year build is nearing its end!

Last few things to do before running in trials commenced, was to add the last of the electric lighting (made from resin casting Nu-Cast A2/1 electric lighting parts, and modifying them to suit 60113) and the addition of a smokebox numberplate.


The model was then given a few coats of acrylic primer (grey, from the Humbrol range).


I checked all was well before re-masking the whole model and applying Gamesworkshops Chaos Black Acrylic spray to the relevant areas of the model.


The result, is rather nice if I do say so myself!


I'm thrilled at the finish of the model. Graeme King designed this conversion kit supremely well, and for someone as ham fisted as me to actually make something like this says much of his design skills.


I'll be painting the bufferbeam red, and fitting the buffers, coupling and vacuum pipe before I head up to High Wycombe to use HWMRC's test track for final fettling and testing.

For now, I'm feeling very happy with the finish of the model. I can't wait to paint it blue, apply the transfers and lightly weather it. The culmination of a project started nearly six years ago is coming closer and closer.


A quick footnote: these are not the nameplates I will be using, I am waiting on straight sided ones, but I bought these as a set of spares in case I build a dark green one at a later date. These are a set from Modelmaster, where my straight sided nameplates are also on order with.

Until next time, good night.

"Ivatt N1: Detailing and Resin Casting..."

$
0
0

My first Ivatt N1 model (now with a chosen identity: superheated no.69478 of Bradford shed) is nearing completion, and has had a plethora of detail parts added.

I've elected to recycle as much of the donor Hornby N2's bodyshell as possible, re-using all of the handrail knobs, the safety valves and even the rear coupling hook. Handrails on the boiler, bunker and the cab have been fitted.


Which brings me on neatly to these. They will need cleaning up, but they are otherwise perfect copies of the Hornby N2's steps for the front running plate, and under the cab (including the piping). These have been cast from a mould I created, and are made of Alumilite.


The smokebox door dart is a Markits type, whilst the buffers are the 3D printed originals, which I figured I would use on this build to save a bit more money. Notice also that I have completed the centre driving wheel splasher with a little plasticard and some filler.

The next stage is fitting the coal rails, piping and a few other bits and pieces before finishing the model off in a plain black livery with "British Railways" on the tanksides.

Until next time.
Viewing all 149 articles
Browse latest View live